

Concrete Slump Cone Test Procedure: Apparatus, Processes & Slump Cone Size
Slump test is the most commonly used method of measuring consistency of concrete which can be employed either in laboratory or at site of work.

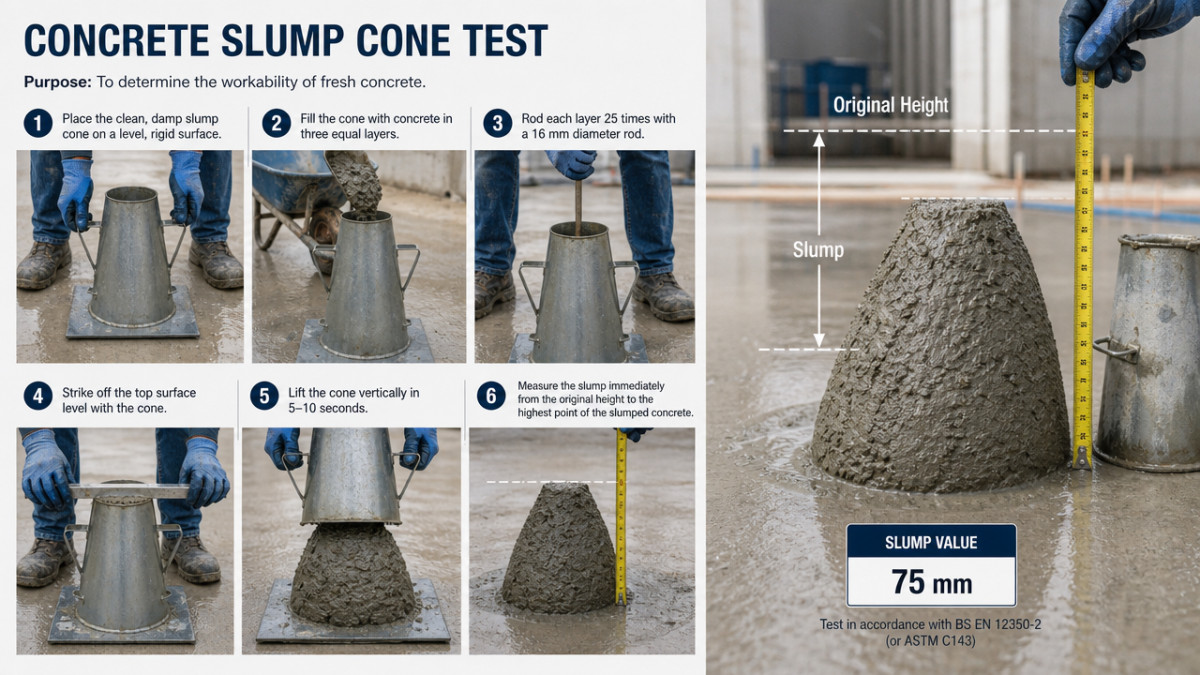
Slump Cone Test: Standard Size, Apparatus & Step-by-Step Procedure
A fresh load of concrete is only as good as its workability. If you pour a mix that is too stiff, you get voids and honeycombing. If it is too wet, you lose structural strength and risk segregation. The slump cone test is the standard way to check this on the job site. It provides a fast, reliable number so you can decide if the batch is ready to pour or needs an adjustment.
Understanding the slump cone test takes more than just looking at the final number. It requires knowing the exact equipment specifications and the proper technique. When you follow the right steps, you gain confidence in the concrete you place. This guide covers the essential gear and the precise procedure you need for accurate testing.
What is a Slump Cone?
A slump cone is a metal cone that's open on both ends. You fill it with concrete to test how the mix behaves. As per IS: 1199 (Part 2) : 2018 the slump cone is 300 mm in height, with a top diameter of 100 mm and a bottom diameter of 200 mm.

What is the Purpose of the Slump Test?
The Slump cone size is measures workability of the concrete.
Workability means how well you can mix, move, place, and finish the concrete without it falling apart. If concrete has too much water, it gets weak. If it's too dry, you can't place it properly and end up with gaps or holes in your structure.
The slump cone test lets you check if your water-cement ratio is right while you're still on the job site.
The Slump Cone Apparatus
The primary piece of equipment is the slump cone itself. It's a cone-shaped mould, open at both ends.
The standard slump cone size as per Indian Standards (IS: 1199) (Part 2) : 2018 is:
-
Top Diameter: 10 cm
-
Bottom Diameter: 20 cm
-
Height: 30 cm
The complete slump cone apparatus also includes a tamping rod (a 16 mm diameter steel rod) and a non-absorbent base plate.
Reference
IS 1199 (Part 2): (First revision) 2018 Fresh Concrete— Methods of Sampling, Testing and Analysis - Part 2
Determination of Consistency of Fresh Concrete
How do you carry out a slump test?
This easy test is carried out in just seven stages, using a slump cone, a steel rod, and a measuring stick. Here’s how you carry out the test:
Tools Required: Slump cone, compacting rod, base plate, ruler, moist cloth, scoop, timer.
- Place the slump cone on a flat, smooth, horizontal surface and stand on the footholds either side to ensure the cone is planted firmly on the ground
- Fill the cone in three equal layers, using the steel tamping rod to compact – or tamp – the concrete after each layer in an even, uniform manner (this should be done 25 times per layer).
- Once the cone is filled, remove any overflowing concrete from the top, making sure the concrete fills the cone exactly to the top level. Remove any spilled concrete from the base of the cone, too.
- Lift the cone vertically, using a slow and steady motion until the cone is clear of the concrete. Place the cone upright on the surface next to the concrete.
- The concrete will subside – or slump. To measure the slump, place the steel rod across the top rim of the upright cone so it overhangs the concrete.
- Now, measure from the rod down to the highest point of the slump. The level of slump is measured to the nearest 10 mm; include 2-5 s lift time; ?150 s total test time; valid slump range 10-210 mm; if the slump keeps changing after 1 min, the result is invalid.
| Slump, in (mm) | Degree of Workability | Application |
|---|---|---|
| 0–1 (0–25) | Very low | Very dry mixes in slip forms or paving machines with high-powered vibration |
| 1–2 (25–50) | Low | Low-workability mixes used for foundations with light reinforcement; Pavements consolidated by hand-operated vibration |
| 2–4 (50–100) | Medium | Medium workability mixes for manually consolidated flat slabs. Normal reinforced concrete manually placed; heavily reinforced sections with mechanical vibration. |
| 4–7 (100–175) | High | High workability concrete for sections with congested reinforcement; May not respond well to vibration. |
What is the Slump Range?
The acceptable slump value depends on the type of construction.
-
What is the slump cone test value for slab?
Slabs and beams typically work well with 50-100 mm slump. But if you have lots of rebar or are doing foundation work, you might need 75-125 mm so the concrete flows around all the steel bars.
-
What is a good slump for slab?
Most concrete slabs work best with 50-100 mm slump. This gives you concrete that's easy to place and finish but isn't so wet that it loses strength or separates.
-
What should be the slump value for pumped concrete ?
The Degree of workability should be high for pumped concrete and slump value should be preferable above 150 mm.
The slump cone test is a vital quality control measure. It ensures the concrete you use has the correct consistency for a strong and durable structure. In the “very high” category of workability, measurement of workability by determination of flow will be appropriate.
Common errors and best practices
To help you get the best from your slump test, here are some common errors people make:
- Testing an unrepresentative sample, rather than a properly mixed sample
- Using a dry or dirty cone, which skews the result
- Moving the cone during filling or not holding it firmly down on a level base
- Lifting the cone too quickly or tilting and twisting it
- Measuring the wrong point in the slumped concrete
- Trying to change the slump by adding water
And now, some best practice tips to combat these errors:
- Use a clean, dampened cone and a base plate on a firm, level surface
- Fill in three equal layers, rod 25 times per layer, then strike off flush
- Lift the cone vertically in one steady motion and immediately measure
- Treat any collapse as a warning and re-test before speaking to your supplier
- Record the slump, including the time, mix ID and any other observations
What's Your Reaction?
 Like
0
Like
0
 Dislike
0
Dislike
0
 Love
0
Love
0
 Funny
0
Funny
0
 Wow
0
Wow
0
 Sad
0
Sad
0
 Angry
0
Angry
0
Comments (0)