

Free Swell Index Test of Soil as per IS 2720 Part 40
Discover the Free Swell Index Test for soils (IS 2720 Part 40) with our casual, in-depth guide. Understand expansive soils, test procedures, and how to interpret results for safer construction. Essential for civil engineers & students!

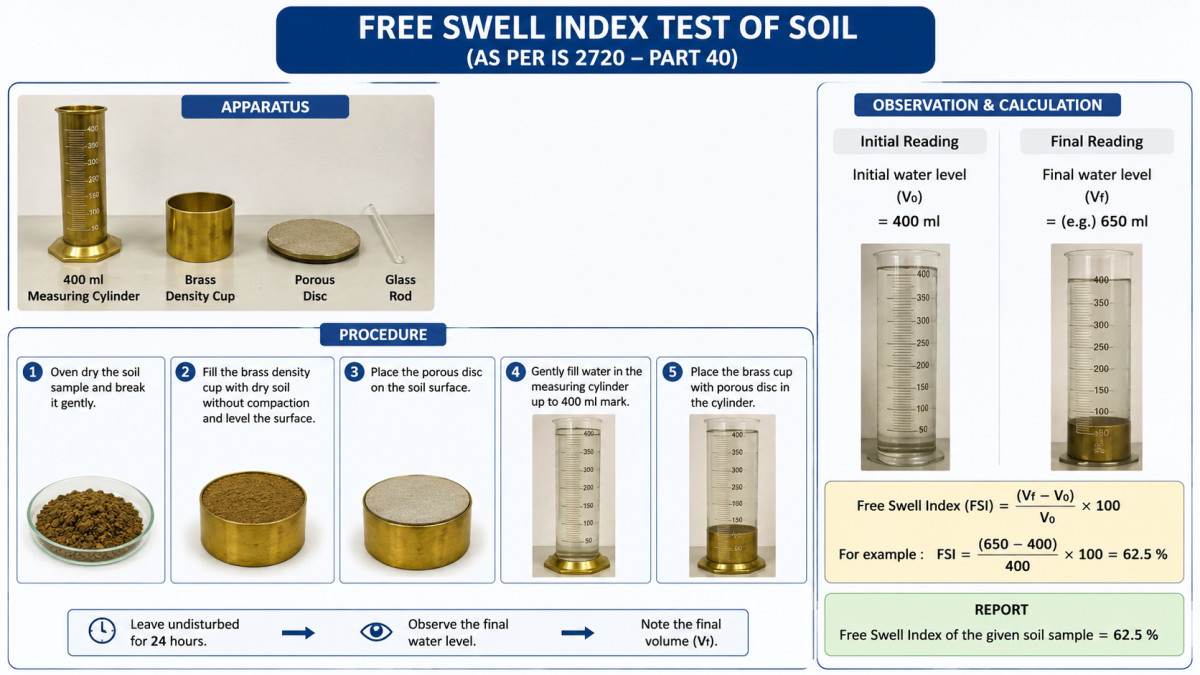
Hey there, future structural saviors and soil whisperers! Ever wondered about the silent threats lurking beneath our buildings and roads? We're talking about expansive soils – those sneaky, swelling grounds that can literally crack foundations and buckle pavements without a sound. They're like sleeping giants, and when they wake up (usually with a dose of water), they can cause some serious headaches for engineers and homeowners alike.
But don't fret! We've got a fantastic tool in our geotechnical arsenal to spot these troublemakers early: the Free Swell Index (FSI) Test. And today, we're diving deep into this super important test, specifically following the guidelines laid out in IS 2720 Part 40. Think of this as your casual, no-stress guide to understanding, performing, and interpreting one of the most crucial preliminary soil tests out there. So, grab a coffee, and let's unravel the mysteries of soil swell!
What's the Big Deal with Expansive Soils Anyway?
Before we jump into the test, let's chat a bit about why expansive soils are such a big deal. Imagine building your dream house on what looks like perfectly stable ground. Everything's fine for a while, but then the rainy season hits, or maybe there's a leaky pipe. Suddenly, tiny cracks start appearing in your walls, floors begin to heave, and doors might even stick. Sound like a nightmare? That's the handiwork of expansive soils.
These soils are typically rich in certain clay minerals, like montmorillonite. What makes these minerals special (and a bit problematic) is their incredible ability to absorb water. When they soak up moisture, their internal structure expands, causing the soil volume to increase significantly. Conversely, when they dry out, they shrink, leaving behind voids and causing settlement. This constant cycle of swelling and shrinking can exert immense pressures on foundations and other structures, leading to costly damage and even structural failure.
That's why identifying these 'active' soils is step one in any construction project. And guess what? The Free Swell Index test is often your first clue!
Demystifying the Free Swell Index (FSI)
So, what exactly is the Free Swell Index? In simple terms, it's a quick, easy, and super effective way to get an initial idea of how much a soil sample might expand when it comes into contact with water, without any external load trying to stop it. That's where the 'free' part comes in – we're letting the soil do its thing without resistance.
The FSI test basically compares the volume of a dry soil sample when immersed in distilled water to its volume when immersed in a non-polar liquid (like kerosene or carbon tetrachloride, which doesn't cause swelling). The difference in volume, expressed as a percentage, tells us its potential for swelling. It's a fantastic preliminary screening test because it's relatively simple, doesn't require super fancy equipment, and gives you a good 'yes or no' answer about whether you're dealing with potentially problematic soil.
IS 2720 Part 40: Your Go-To Guide
In India, when it comes to soil testing, the Bureau of Indian Standards (BIS) has our backs. For the Free Swell Index test, our trusted companion is IS 2720 (Part 40): 1977 – Method of Test for Soils, Part 40: Determination of Free Swell Index of Soils. This standard lays out the precise methodology, ensuring that everyone performing the test follows the same steps. Why is that important? Because it guarantees consistency, reliability, and comparability of results, no matter which lab or engineer performs the test. Following a standard like IS 2720 Part 40 means we're all speaking the same language when it comes to soil behavior, which is crucial for making informed decisions on site.
Gear Up! What You'll Need for the Test
One of the beauties of the FSI test is that it doesn't require a lab full of high-tech gadgets. Most of what you need is pretty standard lab equipment. Here’s your checklist:
- Two 100 ml Measuring Cylinders: These should be glass, graduated, and clean. Accuracy here is key, so make sure the markings are clear.
- Distilled Water: Absolutely critical! Tap water has dissolved minerals that can affect the test results.
- Kerosene (or another non-polar liquid): This is your control liquid. It won't react with the clay minerals, so it helps you determine the soil's initial volume without any swelling. Make sure it's pure.
- Oven: For drying your soil sample. It should be capable of maintaining a temperature below 60°C.
- Desiccator: To cool your dried soil sample without it absorbing moisture from the air.
- IS Sieve (425 Micron): To ensure you're only testing the fine-grained portion of the soil.
- Spatula or Scoop: For handling the soil.
- Weighing Balance: A precision balance, accurate to at least 0.01g, is necessary for weighing your soil sample.
- Stopwatch or Timer: For keeping track of the 24-hour settling period.
Always remember, cleanliness and accuracy of your equipment are paramount for reliable results!
Getting Your Soil Sample Ready
Before you can run the test, you need to prepare your soil sample. This isn't just about scooping up some dirt; proper sample preparation is half the battle won.
- Sample Collection: First things first, ensure your soil sample is representative of the ground you're interested in. Randomly grabbing dirt won't cut it.
- Drying: Once you have your sample, you need to dry it. You can air dry it at room temperature, which is often preferred to minimize any alteration to the clay structure. If you're in a hurry, you can oven-dry it, but make sure the temperature doesn't exceed 60°C. Higher temperatures can irreversibly alter the clay minerals, giving you inaccurate swell results. After drying, let it cool in a desiccator to prevent it from reabsorbing atmospheric moisture.
- Pulverizing: Gently break up any lumps in the dried soil. You want to avoid crushing individual soil particles, especially the clay, as this can change its properties. Use a rubber pestle or your fingers.
- Sieving: This is a crucial step. You need to pass the entire sample through a 425-micron (IS Sieve No. 40) sieve. We're interested in the behavior of the fine-grained particles (silts and clays) for swell potential, so anything coarser than 425 microns needs to be removed. Discard the coarser material.
Once you have your fine-grained, dried, and sieved soil, you're ready for the main event!
Step-by-Step: The Free Swell Index Test Procedure (The Fun Part!)
Alright, lab coats on (figuratively speaking, unless you're actually in a lab!), let's get down to the nitty-gritty of performing the test as per IS 2720 Part 40. It's pretty straightforward, so you'll get the hang of it quickly.
- Weigh Your Soil: Carefully weigh out 10 grams of your prepared soil sample using your precision weighing balance. Accuracy here is important!
- Prepare Your Cylinders: Take your two clean, dry 100 ml measuring cylinders. Label them clearly – one for 'Water' and one for 'Kerosene' (or your chosen non-polar liquid).
- Fill with Liquids:
- Pour distilled water into the 'Water' cylinder up to the 100 ml mark.
- Pour kerosene (or your non-polar liquid) into the 'Kerosene' cylinder, also up to the 100 ml mark.
- Introduce the Soil (Carefully!): This is a key step. You need to add the 10 grams of soil to each cylinder. But don't just dump it in! Gradually sprinkle the soil into the liquid in small increments. As you add the soil, gently tap the side of the cylinder. This helps to dislodge any air bubbles trapped within the soil particles and ensures the soil settles down evenly without clumping excessively. It’s like making a perfect cup of tea, but with soil!
- Let It Settle: Once all the soil is added to both cylinders, give them a final gentle tap to ensure all particles are submerged and no air is trapped. Then, set them aside and let them stand undisturbed for 24 hours. This waiting period is crucial because it allows the soil particles to fully hydrate (in the water cylinder) and settle completely.
- Read the Volumes: After 24 hours, it's time to take your readings. Look at each cylinder and note down the volume of the settled soil. Read the volume at the top of the settled soil column. Be precise with your readings.
- Let Vd be the volume of the soil settled in distilled water (in ml).
- Let Vk be the volume of the soil settled in kerosene (in ml).
And that's it for the practical part! Now, let's turn those numbers into meaningful insights.
Crunching the Numbers: Calculating FSI
Once you have your two volume readings (Vd and Vk), calculating the Free Swell Index is a piece of cake. The formula is beautifully simple:
Free Swell Index (FSI) = ((Vd - Vk) / Vk) * 100
Let's break down what each part means:
- (Vd - Vk): This represents the actual increase in volume due to swelling in water. Since kerosene doesn't cause swelling, Vk gives us the 'true' or initial volume of the soil particles plus any voids that can't be filled by the non-polar liquid. Vd is the volume after swelling.
- / Vk: We divide by Vk to express the swell as a proportion of the original (non-swollen) volume.
- * 100: Multiplying by 100 simply converts the proportion into a percentage, which is easier to understand and compare.
Example Time!
Let's say you performed the test and got these results:
- Volume of soil settled in distilled water (Vd) = 18 ml
- Volume of soil settled in kerosene (Vk) = 10 ml
Using the formula:
FSI = ((18 - 10) / 10) * 100
FSI = (8 / 10) * 100
FSI = 0.8 * 100
FSI = 80%
So, this soil has an 80% Free Swell Index. But what does that actually mean for your construction project?
What Do the Numbers Mean? Interpreting Your FSI Results
The calculated FSI value isn't just a number; it's a critical indicator of your soil's potential for trouble. IS 2720 Part 40, along with general geotechnical practice, provides guidelines for interpreting these percentages. While these are general classifications, they give you a strong initial understanding:
- FSI < 50%: Generally considered low swell potential. These soils are usually quite stable and pose minimal risk of volume change due to moisture fluctuations. You might still need to consider other factors, but FSI-wise, you're in a good spot.
- FSI 50% - 100%: This indicates medium swell potential. These soils can cause moderate issues. They might require some special design considerations for foundations, such as deeper footings or a slightly stiffer slab.
- FSI 100% - 200%: Now we're getting into the red zone! This is considered high swell potential. Soils in this range are definitely problematic and will require significant geotechnical investigation and specialized foundation designs. Think deep foundations (piles, piers) or highly rigid raft foundations to bridge over the swelling zones.
- FSI > 200%: This is very high swell potential. These soils are extremely dangerous for conventional construction. Building on such soils without extensive and specialized engineering solutions (like chemical stabilization, pre-wetting, or structural isolation) is a recipe for disaster. Often, these soils might be deemed unsuitable for certain types of construction altogether.
Remember, the FSI is a preliminary index. It's a fantastic first alarm, but it doesn't tell the whole story. For critical projects, you'll definitely want to follow up with more advanced tests like consolidation tests (to determine swelling pressure) or direct shear tests.
Factors That Mess With Swell (Beyond FSI)
While the Free Swell Index gives you a great snapshot, it's important to understand that actual soil behavior in the field is influenced by a cocktail of factors. The FSI is an indicator, but it doesn't account for everything. Here are some other elements that play a huge role in how much a soil will truly swell:
- Clay Mineralogy: This is arguably the biggest factor. Montmorillonite (a type of smectite clay) is the king of swelling, capable of absorbing multiple layers of water molecules between its structural units. Kaolinite and illite, on the other hand, have much lower swell potential. The FSI helps indirectly identify the presence of these active clays.
- Initial Moisture Content: A soil that is already saturated or near its plastic limit will have less capacity to absorb more water and thus less potential to swell further compared to a very dry soil.
- Dry Density: Denser soils, with less void space, generally have less room to expand, though they might exert higher swelling pressures if they do swell. Looser soils might swell more in terms of volume.
- Type of Compaction: How a soil is compacted (e.g., at what moisture content and energy) can significantly influence its fabric and, consequently, its swell potential.
- Confining Pressure (Overburden): This is a big one that FSI doesn't directly measure. In the real world, soil beneath a structure experiences a confining pressure from the weight of the building and the overlying soil. This pressure can resist swelling. A soil with a high FSI might still not cause significant damage if the confining pressure is high enough to restrict its expansion.
- Groundwater Fluctuations: Seasonal changes, leaky pipes, poor drainage, or even nearby irrigation can cause significant fluctuations in soil moisture, triggering those dreaded swell-shrink cycles.
- Soil Structure and Fabric: The arrangement of soil particles can also influence how water enters and causes expansion.
Understanding these additional factors helps engineers develop a more holistic picture of the site conditions and design more robust solutions.
Limitations of the FSI Test (Keep it Real)
Every test has its strengths and weaknesses, and the Free Swell Index is no exception. It's crucial to acknowledge its limitations to use it wisely:
- It's an Index Test: The FSI provides an index, a relative measure of swell potential. It does not directly give you the actual swelling pressure (how much force the soil exerts when it swells) or the exact amount of swell you'd see under real-world loading conditions.
- No Confining Pressure: As the name suggests, it's a 'free' swell test. It doesn't account for the overburden pressure or the weight of a structure, which would naturally restrict swelling in the field.
- Doesn't Account for Cycles: The test is a one-off observation of swell. In reality, soils often undergo multiple wetting and drying cycles, which can have different effects on their long-term behavior.
- Only for Fine-Grained Soils: The FSI test is specifically designed for fine-grained soils (silts and clays). It's not applicable or meaningful for gravels or sands, which don't exhibit significant volume change due to moisture absorption.
- Temperature Sensitivity: While not explicitly part of the IS standard's calculation, temperature can affect the viscosity of water and the rate of hydration, though its impact on the final settled volume is usually minor if the 24-hour period is observed.
Despite these limitations, the FSI remains an invaluable first-pass test. It's like a quick health check-up for your soil, telling you if you need to investigate further.
Beyond the Lab: Practical Applications and Why It Matters
So, you've done the test, crunched the numbers, and interpreted the FSI. Now what? The insights gained from the Free Swell Index test have profound practical applications in various fields of civil engineering:
- Site Selection for Construction: Before a single brick is laid, FSI helps identify areas with high swell potential. This can influence the decision to build in a particular location or necessitate extensive ground improvement.
- Foundation Design: For structures built on expansive soils, FSI is a critical input for foundation engineers. It guides the choice between conventional shallow foundations (which might be risky) and specialized deep foundations (like piles or piers that extend below the active swell zone) or stiffened raft slabs designed to resist differential movements.
- Road and Pavement Design: Expansive subgrades can lead to severe cracking and undulations in roads. FSI helps engineers design appropriate sub-base layers, stabilization techniques, or even select alternative routes to avoid highly expansive areas.
- Canal Lining and Landfill Liners: In projects involving water retention or waste containment, understanding swell potential is vital. Expansive clays can be used as effective barriers due to their low permeability when swollen, but their shrink-swell cycles can also compromise liner integrity if not properly managed.
- Early Warning System: For geotechnical engineers, the FSI is an excellent preliminary screening tool. It quickly flags potentially problematic soils, prompting further, more detailed (and often more expensive) investigations where they are truly needed, saving time and resources.
- Material Selection for Earthworks: When importing fill material for construction, FSI can be used to ensure that the imported soil doesn't introduce new swell problems to the site.
Ultimately, the Free Swell Index test empowers engineers to make informed decisions, mitigate risks, and design structures that are safe, durable, and cost-effective, even in challenging soil conditions.
Wrapping It Up: Your Soil Superpower
There you have it! The Free Swell Index test, as per IS 2720 Part 40, is a simple yet incredibly powerful tool in the world of geotechnical engineering. It's your first line of defense against the hidden dangers of expansive soils, offering a quick and reliable way to assess a soil's potential to swell and shrink with changes in moisture content.
By understanding how to correctly perform this test, interpret its results, and acknowledge its limitations, you're not just running a lab procedure; you're gaining a crucial superpower to build safer, more resilient infrastructure. So, whether you're a student learning the ropes or a seasoned engineer on the job, embrace the FSI test. It’s a fundamental step towards understanding the ground beneath our feet and ensuring our structures stand strong for years to come. Happy testing, and may your soils always be stable!
What's Your Reaction?
 Like
0
Like
0
 Dislike
0
Dislike
0
 Love
0
Love
0
 Funny
0
Funny
0
 Wow
0
Wow
0
 Sad
0
Sad
0
 Angry
0
Angry
0






Comments (0)